Appointments, walk-ins & professional cases
Use the appointment book for scheduled time, the walk-in queue for counter work, and a case account for continuing professional work. Each route keeps its own accountable record.
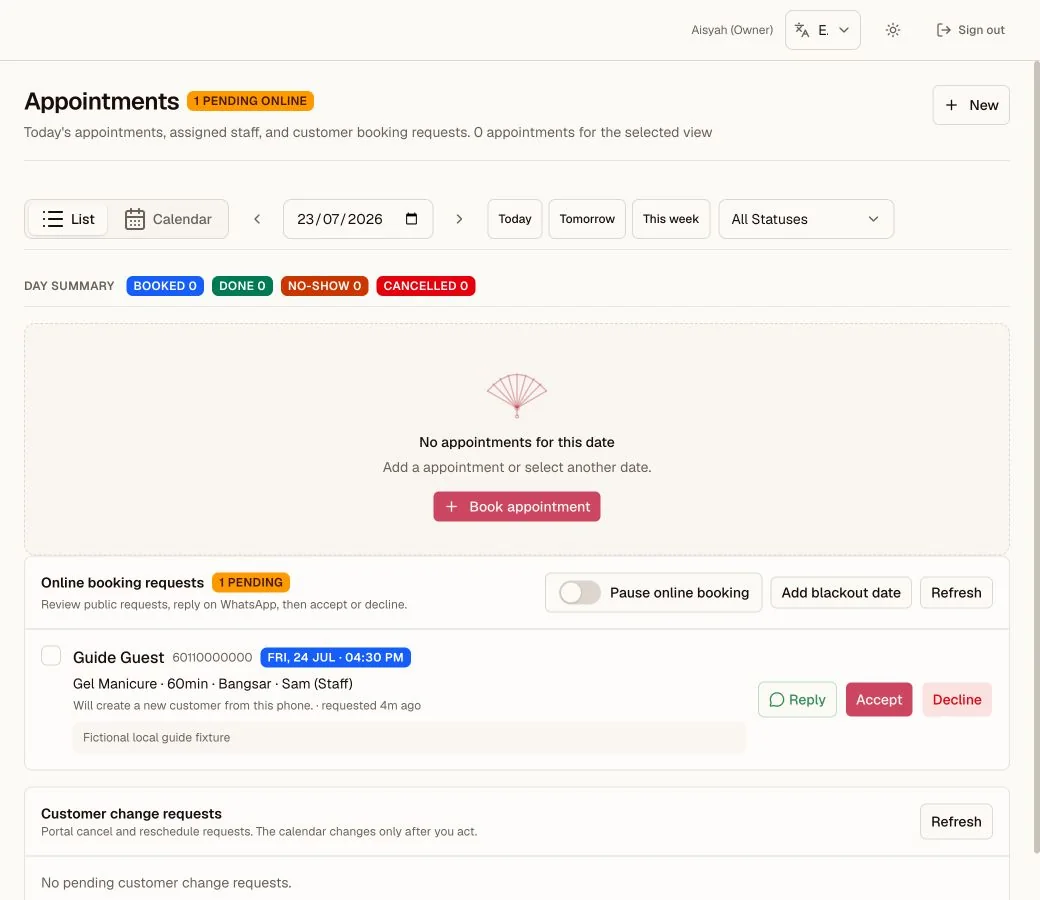
Booking request handling
A public request stays pending until the team replies, accepts it, or declines it.
- 1The pending count remains visible beside the page title.
- 2Owners can pause booking or add a blackout date here.
- 3Reply, accept, and decline are explicit team decisions.
SIX EDITIONS, ONE GUIDE
This chapter walks the appointment book and the walk-in queue the way a salon runs them. If your workspace runs another edition, the part that replaces this chapter lives in its own: retail jobs in chapter 15, catering events in chapter 16, wellness visits in chapter 17, and professional sessions in chapter 18. The counter, money, and closing chapters apply to every edition unchanged.
7.1 Booking an appointment
- 1
Start a booking
Tap Book (POS top bar) or New (Admin → Appointments).
- 2
Choose the customer and services
Choose the customer, the branch, and one or more services; total duration adjusts itself.
- 3
Choose time, staff, and resource
Pick date & time, and optionally the staff member. If the branch uses scheduling resources, you can also choose a room, station, or equipment item. Wellness and professional services workspaces can also set a Group size.
- 4
Create the appointment
Create. If the same staff member is already booked at an overlapping time, you'll get a conflict warning; adjust time or assign someone else.
A staff member's My Day page puts assigned one-to-one and group sessions into one time-ordered agenda for today and the next 7 days. An assigned room, station, or equipment item appears on that session. Group sessions show the active attendee roster. Its WhatsApp tasks card lists tomorrow's reminders and a short follow-up preview: expiring credit and memberships, birthdays this month, unused free visits, and lapsed customers. The full follow-up list, including customers with no next booking, is on Messages > Follow-ups.
The Appointments page opens on the current day. Appointment-led professional workspaces place booking requests and group work before the schedule. Other workspaces keep the day schedule first. A wellness workspace does not enable the walk-in queue by default. If the owner enables it, the queue appears as real work on Overview and My Day. These changes affect presentation only. The same bookings and filters remain available.
Views: List or Calendar, date arrows, and status filters. On Calendar, drag a booking to another time or another staff lane to reschedule it; hold a moment before dragging on a tablet. Kipas checks the new slot exactly as it checks a new booking, so a clash is refused and explained, and a message offers Undo for five seconds. A day that is already past shows its bookings for reference but takes no new ones. From My Day, Home, or Messages, use Open appointment. Users who can manage the calendar jump straight to that record. View-only users open the correct date and can see the appointment in the list. No-phone customers book normally. They do not get WhatsApp reminders. Customers marked Do not contact keep their appointments but do not appear in reminder targets until an owner turns that setting off. This control does not depend on AI. Kipas AI does not write customer-addressed messages in this release. Staff review and edit the prepared reminder before WhatsApp opens the current text. Booking confirmations follow the business-wide Friendly, Short, Formal, or Custom WhatsApp choice in the current Kipas language. If the browser blocks a reminder or confirmation-link window, Kipas stops before creating the link or marking it opened. Allow pop-ups, try again, and keep the new tab open until WhatsApp appears.
When you edit an appointment, the service list stays closed until you type in the service search box. This keeps the customer, staff, date, and time fields easy to reach. After you add a match, the same search stays open so you can add another matching service.
Owners and branch managers can open Business setup → Resources to add rooms, stations, or equipment. The appointment form shows the optional Resource field only when the selected branch has an active resource. Kipas blocks overlapping appointments that use the same resource. Public demo managers can inspect Schedule and the Resources seeded for wellness and professional workspaces. These pages are read-only. Demo staff do not receive these manager-only links.
For a group session, the lead customer uses the first place. Create the appointment, reopen it, and use the roster to add an existing person or quick-add a Booking contact. Kipas will not let the roster exceed the group size. If adding the new contact to the roster fails, the Booking contact stays searchable so you can retry or find it later. Each attendee with an email gets their own appointment reminder, and each can confirm their own place from it.
An owner can publish a saved group session from its roster panel. The public page shows the service, branch, date, time, and number of places left. In Pending requests mode, accepting the request adds the customer to the existing roster. It does not create another appointment. In Auto-book mode, submission adds the customer at once. Kipas locks the group session before it adds a place, so two customers cannot take the same last place.
7.2 The appointment lifecycle
Scheduled → Confirmed → In progress → Completed (or Cancelled / No-show). Accepting an online request creates a Scheduled appointment and reserves the time. The customer confirmation link changes it to Confirmed when the customer says they are coming. Update status from the appointment itself when staff confirm by another channel. The new status appears immediately. Reversible changes include Undo for five seconds. If saving fails, the previous status returns. A wrong tap into Cancelled or No-show is not stuck: an owner or branch manager can use Restore from the same appointment, on the Appointments page or in POS, at any time afterward, not just within the five-second window; it always asks before changing the record. Restore marks the appointment Confirmed. Kipas automatically marks a Scheduled appointment No-show once its time passes with nobody updating it, so a past appointment restored straight back to Scheduled would only be swept to No-show again; Confirmed avoids that and is one tap closer to Start Service besides. On My Day, the Appointments page, or from POS itself, use Open in POS for today's appointment. POS selects its branch and expands the exact appointment. Review it, then use Confirm or Start Service as needed. Opening it does not change its status. Anyone working the counter can check a customer out of any of today's appointments at that branch, not only the staff member it is assigned to; POS still shows who it was booked with. A one-person sale completing marks it Completed. If a customer is selected into an empty cart by search and they also have an open appointment today, POS offers Start from appointment so the sale still links back to it. If the selected customer has more than one open appointment today, choose the correct appointment before POS fills the cart. An active walk-in or job must be completed or detached with Change before an appointment can start. Either way, POS verifies every booked service before it changes the appointment to In progress; a service deactivated after booking still enters the cart, named for review, and a booked service that cannot be verified stops the handoff with no services added and no status change.
For a multi-branch counter user, Open in POS switches to the appointment's assigned branch before it opens, when that branch is assigned to you. It never moves an active sale, so finish or clear that sale first.
For a group session, POS asks which attendee is checking out. Complete one sale and one receipt for that person. The appointment stays In progress while another booked attendee is waiting. The last attendee checkout marks the session Completed. You can still complete the appointment directly when the session ends without another checkout.
When a customer asks to cancel through their portal, use Cancel appointment in Customer change requests. For a reschedule request, use Reschedule appointment, review the requested time, and apply it. Kipas updates the appointment and closes the request together. Use Decline request when the appointment must stay unchanged. Use Close as handled only when the team completed the work another way; that action does not change the appointment. After a cancellation or a declined request, Kipas emails the customer automatically when an address is on file, and the confirmation toast offers a one-tap WhatsApp message with the same outcome.
7.3 Online booking requests (from your public page)
New customers and customers without a personal portal link use the public link from Settings to request a one-to-one appointment or a published group session. Customers with a portal link can book another appointment without entering contact details again. In Pending requests mode, your team reviews each request. Accepting a one-to-one request reserves the time, creates a Scheduled appointment, and creates its customer confirmation link. Accepting a group-session request adds the person to the existing roster. If no matching phone identity exists, acceptance creates a Booking contact. The record becomes a customer only after completed checkout.
Requests with the same phone, branch, service, and time stay together. Kipas marks each later copy as Duplicate request. After you accept one request, its matching copies show Already booked and no longer show Accept. If another appointment uses the same time, the request shows Time may be full, but Accept stays available and verifies staff capacity. If no staff remain, the request changes to Slot no longer available. Reply on WhatsApp so the customer can pick another time, then decline the old request.
In Auto-book mode, a one-to-one request inside your rules creates the appointment at once. A group-session request takes a place at once when capacity remains. Kipas checks the slot or group capacity again inside the booking transaction.
You do not have to watch the page for new requests. Every new booking request emails the workspace owners within about a minute, with the customer, the service, and the time they asked for. One email per request: replying to a request or opening the page never triggers another.
When customer emails are on in Settings and the requester has an email on file, accepting or declining also emails them the outcome. An accepted one-to-one request includes the same confirmation link as the WhatsApp message. An accepted group-session request confirms the place but does not include a link that can change the shared appointment. The customer must contact the business to change a group-session place. The toast notes whether the email went out or was skipped.
Every reminder and booking-outcome email ends by telling the customer how to reach you. It offers a reply only when your workspace has a reply-to address on file; otherwise it gives your branch phone number, and when neither exists it simply asks them to contact the business. Keep the branch phone filled in under Settings so a customer who wants to change or cancel always has a way through.
The booking form also has an optional email field with a consent tick box for birthday and offer emails. When you accept the request, that email and consent are saved to the matched record, but only if the record has no email yet. Anything your staff typed is never overwritten.
7.4 The walk-in queue
- Walk-ins page: add a customer to the queue when they arrive; see who's waiting; assign and serve. To change the order, drag a waiting card by its grip, or use the up and down arrows; a message offers Undo for five seconds.
- Link an existing customer when you can. If customer search is unavailable, use Try again; the form keeps the one-off queue option open without pretending there was no match.
- The dashboard's Next in Queue card keeps the front desk honest about who's next.
- When their turn comes, tap Start in POS on the queue card. POS loads the linked customer and requested services, then marks the queue entry In service. Complete payment there.
- In service also has Complete without a sale. It asks first. Use it only when they leave unpaid. Use Checkout if they paid.
- For a completed walk-in, View in receipts opens that sale's exact receipt; no searching the receipt list again.
- Retail and services teams: this page is Jobs. After you write a ticket, payment and hand-back live there, not in POS. See chapter 15.
Prefer everything on one page? Read the whole guide.