Making a sale
One flow, every time: who → services → payment → checkout. Learn it once and the counter runs itself.
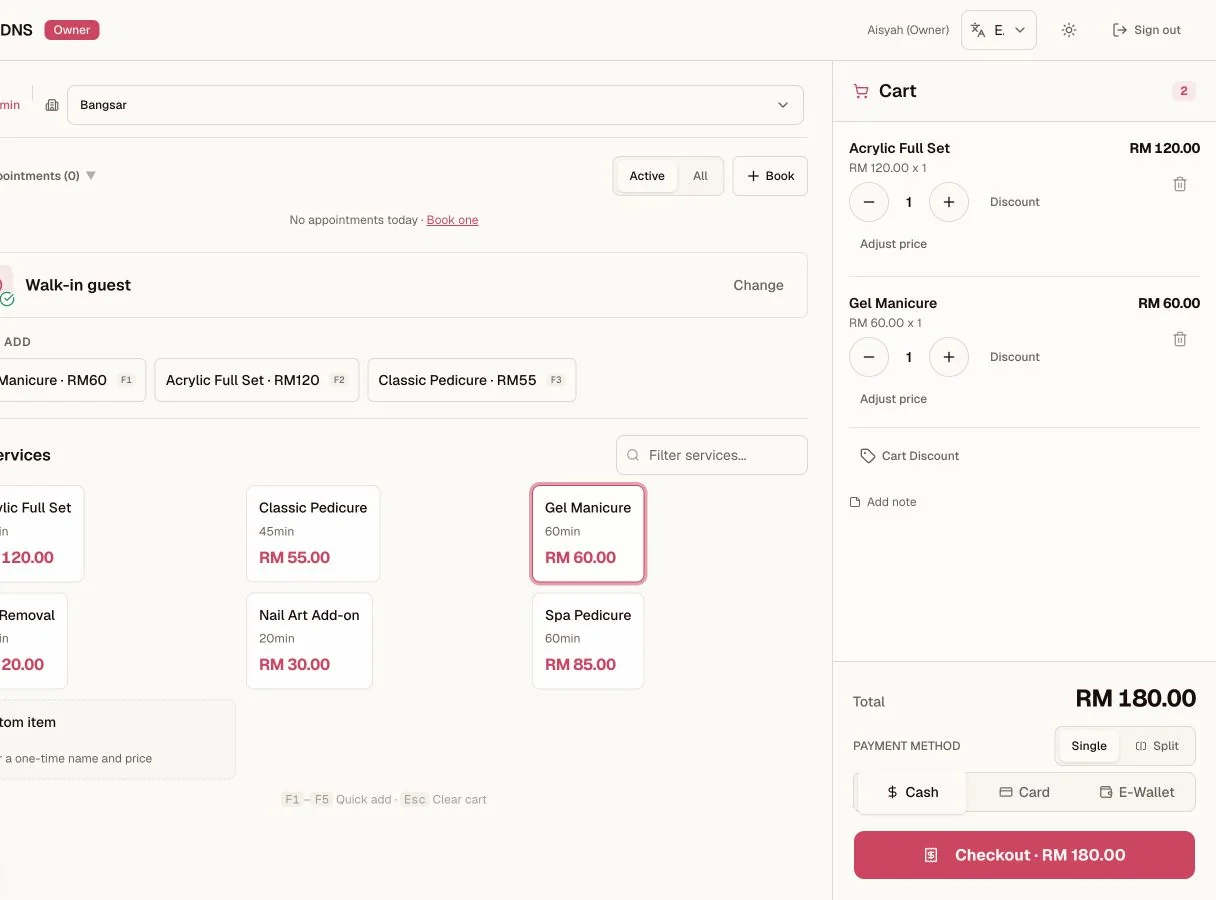
POS checkout
Choose the customer, add services, review the total, then record the payment method.
- 1The sale starts with a walk-in or registered customer.
- 2The cart keeps quantities and the total together.
- 3Payment stays visible beside the final checkout action.
3.1 Step one: who is this sale for?
| PATH | WHEN TO USE IT | WHAT IT UNLOCKS |
|---|---|---|
| Walk-in | Customer not in your list, or in a hurry | A fast sale. No member prices, credit, or free visits; those need a profile. |
| Search | Returning customer or booking contact: type name or phone | Customers show package credit and membership. Roles that can view customer details also see visits, spend, and service notes. A Booking contact stays clearly labelled, has no customer perks before checkout, but can buy a package or membership. |
| New contact | First booking or visit | Create a Booking contact on the spot. A completed checkout changes the same record into a customer. |
Selecting a customer shows their notes only when the role can open customer details, so the right things are remembered before the service starts. A salon sees preferred shape, colours, and allergies; a wellness practice sees comfort preferences and methods to avoid; other workspaces see their own service notes. An owner can hide the Customers page for staff or branch managers. This does not stop a POS sale: they can still search by name or phone and see only the buyer's name, phone, package credit, membership, and voucher facts. Profile notes and history stay hidden. A Booking contact can buy services, packages, or memberships in POS, but customer notes, rewards, package credit, member prices, and vouchers stay unavailable until checkout completes.
3.2 Step two: add services
- If you are assigned to more than one active branch, choose the branch you are standing at before you add items. You can do this in Simple or Full POS. The counter will not move an active sale to another branch. Finish or clear it first.
- Tap a service card to add it at list price. Cards show duration and price.
- The service list opens instantly from a saved copy on your device, then refreshes in the background. If the latest prices cannot be checked, a Using the saved catalog notice appears; tap Refresh catalog before checkout so every price is current.
- Filter services… finds anything in two keystrokes.
- On a phone, the category row moves through a long service list without opening the cart.
- For a selected customer or Booking contact, the visible Services, Packages, and Memberships tabs switch the sale catalog without a long scroll.
- On a keyboard,
Escopens the clear-cart confirmation. - Member price, Use credit, and Use free visit buttons appear automatically when the customer qualifies; that's the next chapter.
3.3 Step three: the cart
- On a phone, tap View cart after you add the items. Use Back to services if the cart needs another item.
- Review lines; remove a mistake with the trash icon before checkout (after checkout, it's a void; see Chapter 09).
- Choose Cash, Card, or E-Wallet, or use Split for mixed payment (Chapter 05).
- The total is always visible; nothing rounds silently.
- Clear cart also clears the sale's discounts, payment split, note, and appointment link, so nothing from an abandoned sale carries into the next one. Change clears the full sale the same way before another customer is selected.
- If a sale was interrupted, an Unfinished sale from earlier banner offers Restore or Discard once the cart is empty again. An appointment, walk-in, receipt correction, or customer checkout link does not replace an unfinished sale for the same branch. Restore or discard it first, then open the link again. Restoring an unfinished sale checks its services against the live catalog. Current service amounts replace saved amounts. An inactive or missing service blocks restore. A deliberately adjusted amount stays only with its recorded reason. When amounts changed, any saved split payment is cleared too; enter the split again against the refreshed total.
FROM APPOINTMENT TO SALE IN ONE MOVE
If the customer booked, open their appointment (top of POS, or Appointments) and start checkout from there; customer and services ride straight into the cart. An Open in POS appointment link switches to the appointment's assigned branch before it opens, when that branch is assigned to you. It never moves an active sale. Completing the sale marks the appointment Completed for you. It also changes a Booking contact into a customer on the same record. Any staff member working the counter can do this for any of today's appointments at that branch, not only the one it was booked with.
If you instead find the customer by search first and they turn out to have an open appointment today, POS offers Start from appointment right there so the sale still links back to it instead of going through unrecorded. If the selected customer has more than one open appointment today, choose the correct appointment before POS fills the cart. An active walk-in or job must be completed or detached with Change before an appointment can start.
When POS starts checkout from an appointment, it verifies every booked service before it changes the appointment to In progress. A service that was deactivated after booking still enters the cart and is named for review. If a booked service cannot be verified, no services are added and the appointment is not started.
3.4 Step four: checkout & the receipt
- 1
Complete cash payment
For exact cash, complete the sale in one tap. When the customer hands you a larger note, enter Cash received first: tap Exact or a note button, or type the amount, then press Enter to finish the sale. Kipas shows the change before checkout and keeps it visible on the success screen. A short amount cannot be submitted, and an amount it cannot read says so instead of reporting it as short. Credit-only sales still complete in one tap.
- 2
Confirm terminal payment
Card / E-Wallet / Split show a quick "Confirm payment received"; tap it once the money is actually in hand or terminal. For a single E-Wallet tender, staff can open the business's static DuitNow QR. A business with the Fiuu sandbox connection enabled can request a provider QR instead. The provider flow creates the receipt only after the server confirms payment.
- 3
Use the receipt
The receipt screen shows items, totals, and exactly how it was paid. From here, download the PDF, send the receipt by email or WhatsApp, or start a New Transaction. When the owner configures a Google review link, it is included in an unrefunded receipt message.
IF THE CONNECTION DROPS DURING CHECKOUT
Keep the checkout open. When you confirm a card or e-wallet payment, Kipas saves the exact sale reference on this device before it sends the receipt. If the connection drops, do not take payment again. Use Retry exact sale when the connection returns. The same sale reference can create only one receipt.
If a card or e-wallet payment was confirmed but Kipas could not record the sale before a receipt was created, Payment needs review stays open. Do not take payment again. Retry the exact sale, or use Payment reversed or not taken only after you have confirmed that outcome.
REPAIR MONEY STAYS ON JOBS
A repair is not a generic POS sale. Receive it, record its estimate and payment plan, take payment, and hand the item back on Jobs. POS refuses a separate repair sale. If an older queue row has no Repair Job Account, use Add ticket before any payment or handover. Chapter 7.5 covers the full path.
AUTHORITY PAYMENTS STAY WITH THE RECORD
In a Wellness workspace, a visit with its own payment record is not a separate POS sale. If POS directs you back to Appointments, open the appointment and record the payment there. The receipt stays linked to the exact visit, its payment purpose, and its balance. In a Professional Services workspace, case money is recorded on the case account in Cases, never as a second POS sale.
Prefer everything on one page? Read the whole guide.